Amazing Landscapes using Adobe Camera Raw and Adobe Photoshop
Step 1 - Photo Selection
Select the photo you'd like to edit. This is apparently the obvious, but there are some important criteria here. Photoshop is an image enhancer, not Jesus Christ, meaning that it makes good pictures look astonishing, mediocre pictures look good, while bad images will just look mediocre. A good landscape shot, is a shot that keeps the maximum detail possible inside the digital color and exposure range. The biggest problem when shooting landscape is the exposure difference between sky and ground if you are not using filters on your camera to prevent this. This difference can be huge in bright noon daylight, up to 12 stops, while it gets smaller during sunrise or sunsets, up to 6 stops. Here in this tutorial we will work on a mediocre picture though, taken during a sunset, in order to perform a lot of enhancing actions regarding exposure, contrast, white balance and vivid colors. But the important fact is that the exposure difference between the sky and ground was not vast, 6 or maybe 7 stops. This picture was taken with a net lens, without any polarizing filter or graduated nd filter attached. Also note that we are working on a JPG, not a .CR2 image.Step 2 - Open in Adobe Camera Raw
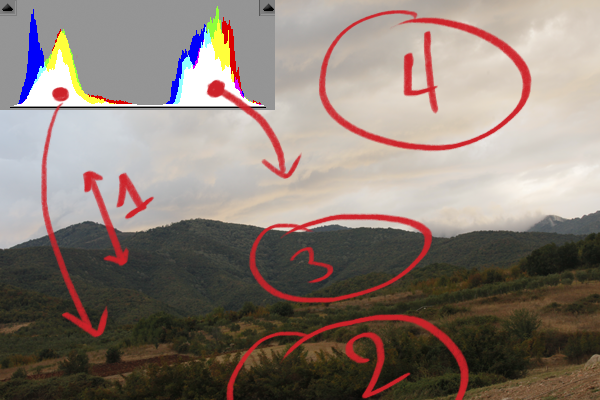
So opening in Adobe Camera Raw (ACR), is the obvious step. First get a good look at the image and spot out what this image could use in order to get top notch. No Photoshop tool replaces a good eye for what needs to be done, so just dedicate some time observing, even if your photoshop skills are not great, both skills and your intuition can be trained simply by observing. So for this image I made a few remarks. For you to comprehend them better I note them on the image using red. This is just to show my mindset when observing an image to enhance, I never actually write anything. I made 4 quick remarks here:
Exposure difference between the ground and the sky
Plants are dark and lack light detail
This area is pale and less contrasty than the rest of the ground
Cloud detail is minimum because of darks absence.
and generally this image has very low contrast, it is colorless, somewhat underexposed but in the little histogram that ACR offers you can see that all information of this image is inside the exposure range, no information is lost, and you can obviously see the two little histogram mountains there, clarifying the two worlds of exposure in this image, ground and sky.
Tidak ada komentar:
Posting Komentar